Installation
This guide covers the two methods for installing Easy Scanlate. For the vast majority of users, the direct executable installer is the recommended method. It is stable, simple, and includes an automatic downloader for required libraries.
| Method | Best For | Difficulty |
|---|---|---|
| 1. Via Windows Installer | All users. The simplest and most reliable way to get started. | Easy |
| 2. From Source Code | Developers, advanced users, or those on other operating systems. | Medium |
1. Via Windows Installer (Recommended Method)
This is the most straightforward way to install the application. The installer handles setting up shortcuts, file associations, and the application’s core files. Currently, an official installer is only available for Windows.
Installation Steps
- Download: Go to the project’s official GitHub Releases Page and download the latest
EasyScanlate-Installer.exe. - Install: Run the
.exeinstaller. It will guide you through the standard installation process. - Finish Installation: Complete the setup, but do not run the application yet.
Crucial Step: Add Antivirus Exclusion (BEFORE First Launch)
IMPORTANT: You must complete this step before you run the application for the first time. If you do not, your antivirus software (especially Windows Defender) will likely quarantine or delete the main executable file (
main.exe), preventing the application from starting.
Why does this happen? This is a false positive. The application is built using a tool called Nuitka, which compiles Python code into an executable. The methods used by this compiler are sometimes incorrectly flagged as suspicious by antivirus programs.
How to Add an Exclusion to Windows Defender:
- Open the Start Menu, type
Windows Security, and open the app. - Go to Virus & threat protection.
- Under “Virus & threat protection settings,” click Manage settings.
- Scroll down to the “Exclusions” section and click Add or remove exclusions.
- Click the + Add an exclusion button and select Folder.
- In the file dialog that appears, navigate to the installation directory. The default location is:
C:\Program Files\EasyScanlateorC:\Program Files (x86)\EasyScanlate - Select the
EasyScanlatefolder and click Select Folder.
By adding this exclusion, you ensure that Windows Defender will not interfere with the application’s files.
First-Time Launch: Model Download
After you have added the antivirus exclusion, you can safely launch the application for the first time.
Easy Scanlate uses RapidOCR for text recognition. On first use, it will automatically download the required ONNX models (a small download, typically under 100MB).
- The first OCR operation may take slightly longer as the models are cached.
- Subsequent launches will be immediate.
Configure API Keys (For AI Translation)
To use the AI Translation feature, you need to configure an API key:
- Get an API Key:
- Mistral (Recommended): Get an API key from Mistral AI Console (1 billion tokens/month free tier)
- Gemini: Get a free API key from Google AI Studio (requires Google account, 20 requests per model per day)
- Add Key to Settings: Open Easy Scanlate, go to
Settings (Ctrl+,)→AI Translationtab, and enter your API key
Note: AI Translation is optional. The application works without an API key for OCR and editing functionality.
2. From Source Code (Alternative Method)
This method is for developers, users on operating systems other than Windows, or those who want access to the very latest updates between official releases. It requires installing Python and Git manually.
Prerequisites
Before proceeding, ensure you have Python and Git installed on your system.
A. Install Python (3.12+ Recommended)
- Download: Go to the official Python website: python.org/downloads/
- Run Installer: Launch the installer.
- Important (Windows): On the first page of the installer, you must check the box labeled “Add Python to PATH” or “Add python.exe to PATH”. This step is crucial for running Python from the command line.
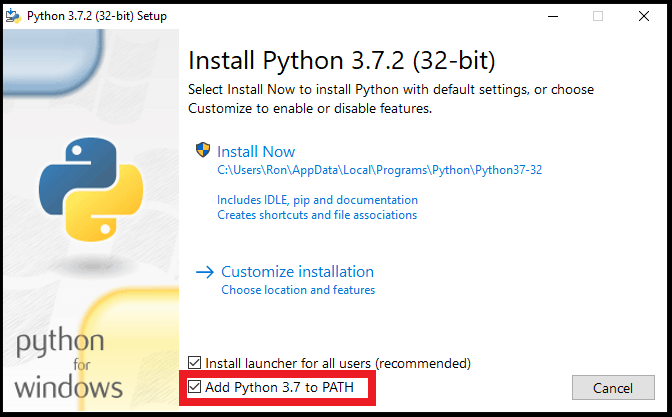
- Complete the installation using the default settings.
B. Install Git
Git is required to download (clone) the application’s source code from its repository.
- Download: Go to the official Git website: git-scm.com/downloads
- Run Installer: Launch the installer and proceed with the default recommended settings.
Installation Steps
The following steps should be performed in a command-line interface (e.g., Terminal on macOS/Linux or Command Prompt (CMD) / PowerShell on Windows).
Step 1: Create a Folder and Download the Code
First, create a dedicated folder for the tool and download the source code into it.
-
Create and Navigate to a Project Folder:
mkdir EasyScanlate cd EasyScanlate -
Download (Clone) the Application Repository: This command uses Git to download the source code into your current folder.
# Note the space and dot " ." at the end.
git clone https://github.com/Liiesl/EasyScanlate.git .
For Advanced Users: Using a Virtual Environment (Optional)
If you are a developer and prefer to keep project dependencies isolated, you can create and activate a virtual environment after running cd EasyScanlate.
# Create the virtual environment
# On Windows:
python -m venv venv
# On macOS/Linux:
python3 -m venv venv

# Activate it (must be done each time you open a new terminal)
# On Windows:
.\venv\Scripts\activate
# On macOS/Linux:
source venv/bin/activate
A (venv) prefix will appear in your terminal prompt when it’s active. All subsequent pip install commands will apply only to this environment.
Step 2: Install Dependencies
Install the required Python libraries from the requirements.txt file.
# On Windows
pip install -r requirements.txt

# On macOS or Linux
pip3 install -r requirements.txt
Step 3: Run the Application
Launch the tool from your terminal. Make sure you are still inside the EasyScanlate directory.
# On Windows (if 'py' launcher is configured)
py main.py

# On Windows (alternative)
python main.py

# On macOS or Linux
python3 main.py
Note: Use
py main.pyif you have the Python launcher configured on Windows. Usepython main.pyfor standard Windows Python installations. Usepython3 main.pyon macOS and Linux systems where Python 2 and 3 coexist.